

The Complete Guide to Commercial Kitchen Ventilation Components
- Agosto 19, 2026

A commercial exhaust hood is the piece of equipment everyone notices. The fourteen other components required to make it function are the ones nobody thinks about until a contractor is standing in the kitchen asking where the unistrut is.
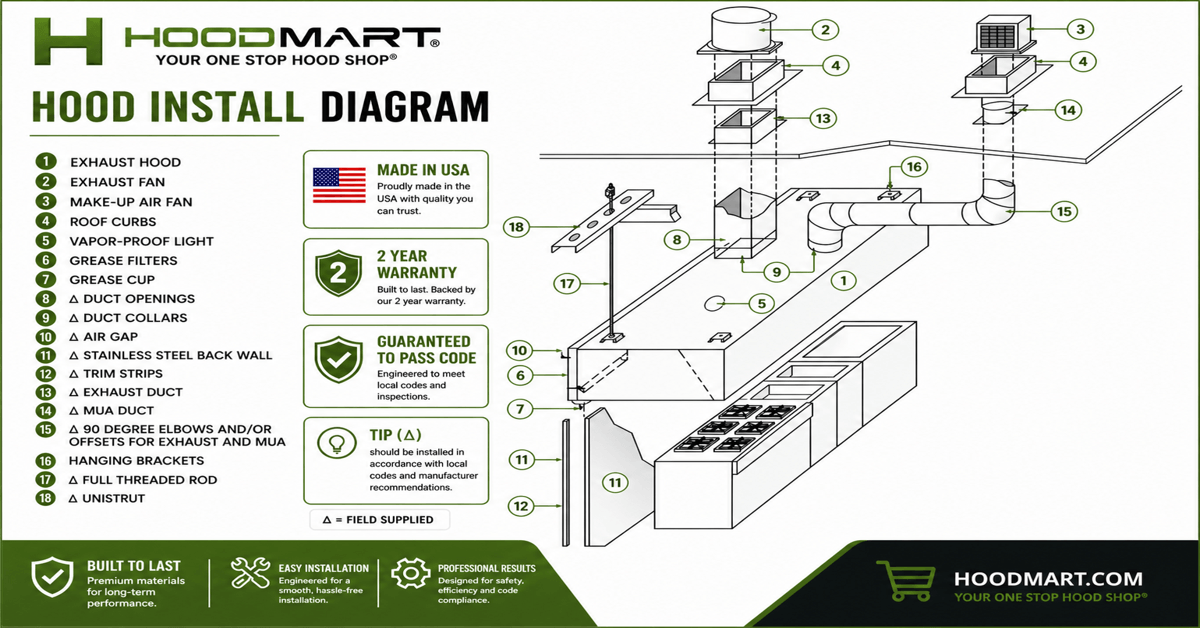
If you've ever purchased (or priced!) a commercial hood system and felt blindsided by the installation conversation that followed, this guide is for you. HoodMart's Hood Install Diagram identifies all 18 components of a complete commercial kitchen ventilation system. Some come with your hood. Many don't. Here's exactly what you're looking at, and why each piece matters.
What "Field Supplied" Actually Means for Your Commercial Hood Installation
Throughout HoodMart's Hood Install Diagram, certain components are marked with a Δ symbol. That symbol means field supplied — items that are not included with your hood purchase and must be sourced, sized, and installed by your contractor based on your specific building conditions.
This isn't fine print. It's a practical reality of commercial kitchen ventilation: no two installations are identical. Ceiling heights, roof configurations, duct runs, and local code requirements vary enough that a one-size-fits-all approach to these components simply doesn't work. Understanding which items fall into this category before you buy is the difference between a smooth installation and a stalled one.
The Components HoodMart Supplies
These are the items included with your HoodMart system — the components that arrive ready to install.
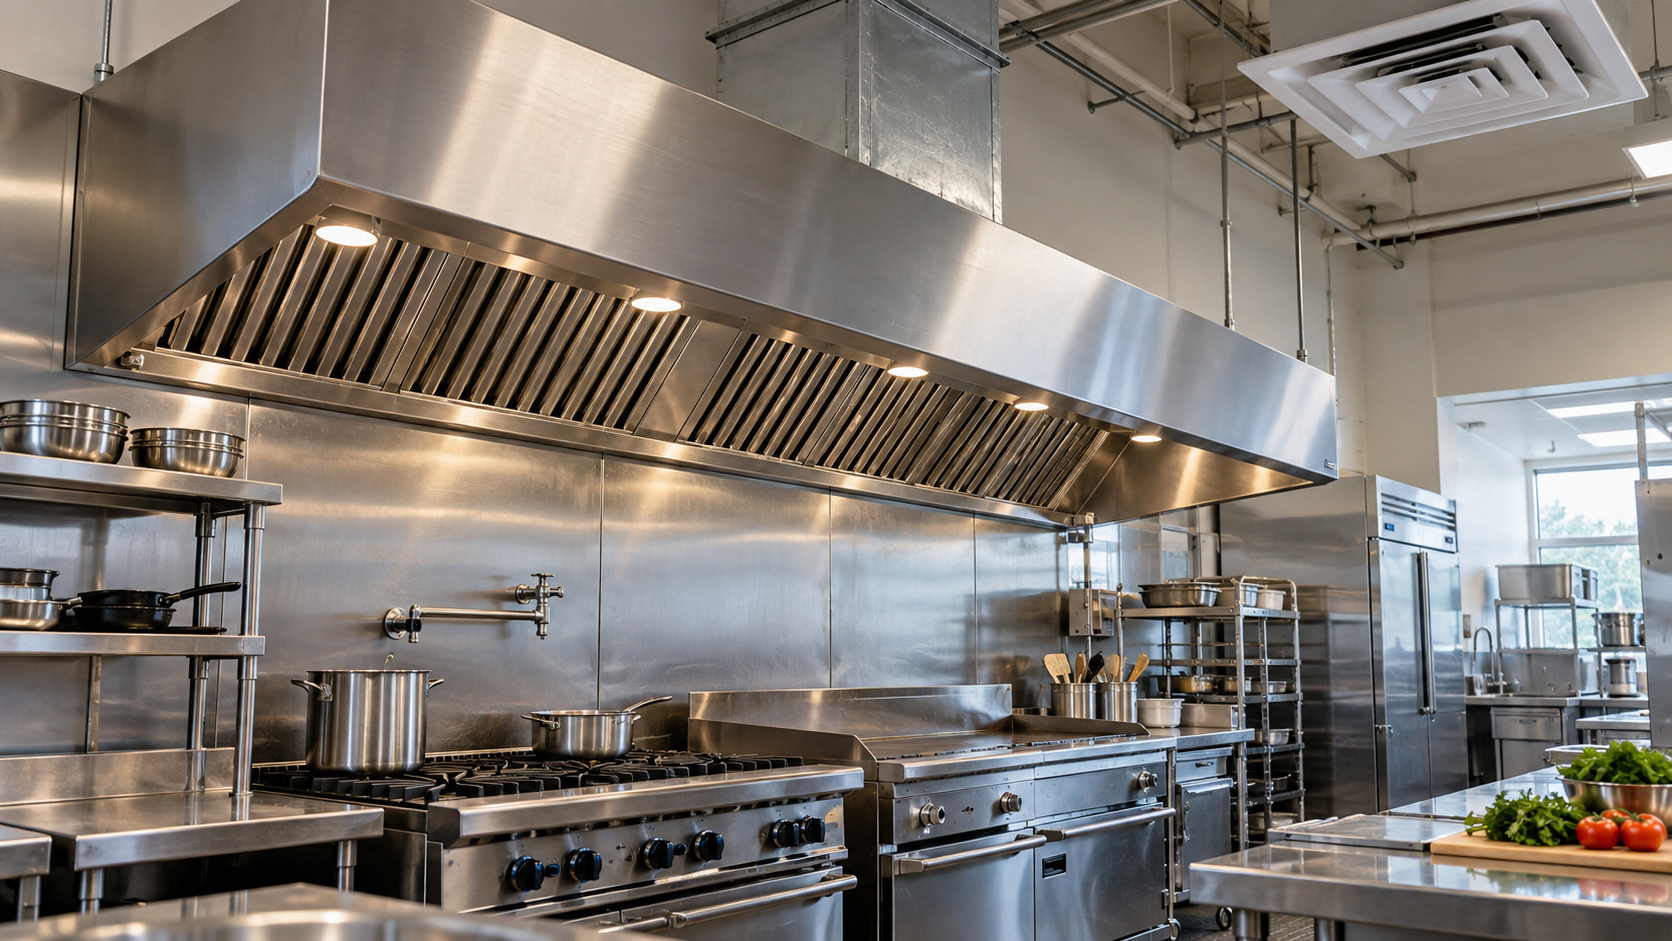
- Exhaust Hood (Component 1) is the canopy itself, positioned above your cooking equipment to capture grease, smoke, heat, and combustion gases. HoodMart's hoods are constructed in the USA and engineered to meet NFPA 96 standards for commercial cooking ventilation.
- Exhaust Fan (Component 2) mounts on the roof and creates the negative pressure that pulls contaminated air up through your ductwork and out of the building. Fan sizing is matched to your cooking equipment's BTU output and the CFM requirements of your system.
- Make-Up Air Fan (Component 3) is the exhaust fan's essential counterpart — the component that replaces the air being expelled so your kitchen maintains proper pressure balance. More on why this matters below.
- Roof Curbs (Component 4) are the raised mounting platforms for both rooftop fans. They elevate the equipment above the roof surface and must be properly flashed to prevent water infiltration.
- Vapor-Proof Light (Component 5) provides code-compliant illumination within the hood. Standard fixtures are not rated for the grease-laden, high-heat environment under a Type 1 hood.
- Grease Filters (Component 6) are the first line of defense against grease entering your ductwork. Baffle-style filters capture grease particles from the airstream and require regular cleaning — typically every 24 to 48 hours of active cook time in high-volume kitchens.
- Grease Cup (Component 7) collects grease draining off the filters. Small component, significant consequences if overlooked — a full or absent grease cup is both a fire hazard and an inspection citation.
- Hanging Brackets (Component 16) secure the hood to the ceiling structure, accounting for the combined weight of the canopy and ductwork above.
The Components You'll Need to Source: A Field-Supplied Breakdown
These are the Δ items — field supplied, sized to your building, and installed by your contractor. Every one of them is required for a complete, code-compliant restaurant ventilation system.
- Duct Openings (Component 8) are the transition points connecting the hood collar to the vertical exhaust ductwork. They must be sized precisely to your system's CFM requirements.
- Duct Collars (Component 9) create the sealed connection between the hood and the duct. An improperly sealed collar is a grease leak — and a grease leak in a duct chase is a fire waiting to be scheduled.
- Air Gap (Component 10) is the required clearance between the hood and adjacent wall surfaces. The specific dimension is dictated by local code and cannot be fudged during inspection.
- Stainless Steel Back Wall (Component 11) protects the wall surface behind cooking equipment. Required by most health codes, it provides a cleanable, non-porous surface that resists grease and heat. It typically runs from floor height to the bottom of the hood canopy.
- Trim Strips (Component 12) finish the edges where the back wall meets adjacent surfaces. Inspectors notice when they're missing, even if the rest of the installation is flawless.
- Exhaust Duct (Component 13) carries contaminated air from the hood collar to the rooftop exhaust fan. For Type 1 systems, this duct must be constructed of minimum 16-gauge black or stainless steel and maintained at code-required clearances from combustibles. Shorter and straighter is always better.
- MUA Duct (Component 14) runs parallel to the exhaust duct, delivering tempered outside air from the rooftop make-up air unit back into the kitchen. Proper insulation prevents condensation and energy loss.
- 90-Degree Elbows and Offsets for Exhaust and MUA (Component 15) are sometimes unavoidable in real-world installations. Each one adds resistance to the airflow path, effectively increasing the load on your fans. Minimize them where possible and account for them in your fan sizing calculations.
- Full Threaded Rod (Component 17) runs vertically from the ceiling structure to the hood, providing rigid, adjustable support during and after installation.
- Unistrut (Component 18) is the steel channel framing that distributes the hood's load across ceiling joists and provides attachment points for the threaded rods. It is unglamorous, load-bearing, and non-negotiable.
Type 1 vs. Type 2 Hood: Does the Component List Change?
Mostly no — the structural and mechanical components apply to both hood types. What changes is the specification level required for each.
A Type 1 hood installation, used over grease-producing equipment like fryers and griddles, requires fire-rated ductwork, grease filters, a grease collection system, and strict clearance requirements per NFPA 96. Every field-supplied Δ component in the diagram applies fully to a Type 1 installation.
A Type 2 hood installation, used over heat-and-moisture equipment like dishwashers and steamers, carries less stringent duct construction and clearance requirements. Grease filters and fire-rated ductwork are generally not required, though local code always has the final word.
When in doubt about which hood type your equipment requires, consult your local fire marshal or AHJ (Authority Having Jurisdiction) before purchasing.
Why Make-Up Air Is the Most Overlooked Component in Restaurant Ventilation Systems
It deserves its own moment. The make-up air fan is consistently the component that first-time commercial kitchen buyers underestimate or omit entirely, and it's the one most likely to cause cascading problems if they do.
Every cubic foot of air your exhaust fan removes from the kitchen must be replaced. Without a balanced make-up air system, the exhaust fan creates negative pressure that makes doors hard to open, causes pilot lights to back-draft, draws unconditioned air through every gap in the building envelope, and ultimately undermines the exhaust performance you paid for. Most jurisdictions require a balanced ventilation system by code. All jurisdictions will notice when it's missing.
Before You Buy: A Pre-Installation Checklist
Before placing your commercial hood order, confirm the following:
- Your cooking equipment type (determines Type 1 vs. Type 2 requirement)
- Required CFM based on equipment BTU ratings and local code
- Ceiling height and available duct chase dimensions
- Roof access and structural capacity for fan mounting
- Local code requirements for duct construction and clearances
- Contractor availability for field-supplied component installation
Pro Tip: Looking for a qualified installer to ensure your system passes code? Utilize the HoodMart installer directory to find a professional in your area!
HoodMart: Built to Pass Code, Built in the USA
HoodMart systems are engineered to meet local code requirements and backed by a two-year warranty. Understanding the full picture of components before your installation begins means fewer surprises, faster inspections, and a kitchen that runs the way it's supposed to.
Ready to get started? Request your free commercial kitchen quote or chat with an expert at 800-715-1014 today!

 CUSTOM FABRICATORRECEIVE INSTANT QUOTE
Loading Fabricator...
PROJECT ID : T626PROJECT NAME :
Already have a project?
Login 0
0
WELCOME
START YOUR PROJECT »
1-2 WEEKS!
CHOOSE CATEGORY

Worktables

Shelving

Counters & Cabinets





WELCOME TO OUR SHOP
PROJECT DETAILS
MANAGE PROJECTS
Save your current project, or modify your previous projects
CURRENT PROJECT
PROJECT NAME :
PREVIOUS PROJECTS
No Projects found.
Thank you for
creating your project with
North American Kitchen Solutions!
Account Login
Have a design in mind? Contact Us for a Free Consult

Blog Home




Dont see your size or need a custom hood?
Let Us Help You!
Talk to a Specialist
Call Now: 1.800.715.1014